- 1. Use Emergency SOS to help first responders
- 2. Set up your Medical ID for emergencies
- 3. Set up a Check In when exploring alone
- 4. Turn on Share My Location and use Find My
- 5. Run a Safety Check before and after you travel
- 6. Know how Roadside Assistance via Satellite works
- 7. Turn on Stolen Device Protection
- 8. Make sure Crash Detection and Fall Detection are turned on
- 9. Get your carrier settings right before you travel internationally
- What if your family or friends use Android?
- iPhone safety settings for solo travelers: FAQ
Solo travel isn't a niche activity anymore. More women than ever before are booking one-way solo tickets and figuring out the rest on the ground, and it's easy to see why: it's a genuinely fun way to travel. That said, when you're traveling alone, it's even more important to take precautions and make sure you're using every safety feature you can.
Your iPhone already has a stack of excellent built-in safety tools, like Emergency SOS, Medical ID, and Check In. These tools are free, easy to set up, and available on most iPhones running the current iOS.
Here are the best iPhone settings to enable before traveling internationally, and how each one actually works.
1. Use Emergency SOS to help first responders

Image: Max McCaskill
Emergency SOS is already turned on by default on every iPhone, and it's the fastest way to get help during an emergency. It's essentially a built-in speed-dial for emergency services.
As long as you have a signal, Emergency SOS calls the local emergency number wherever you happen to be, including in international destinations. You don't need to know that Italy uses 112 or that the UK uses 999. Your iPhone figures that out based on your location and dials it for you.
There are two ways to trigger Emergency SOS:
- Press and hold the side button and a volume button until the Emergency SOS slider appears, then slide it.
- Press the side button quickly five times in a row.
Once the call ends, your iPhone can also automatically text your emergency contacts with your location if you've added them to your settings.
Emergency SOS via Satellite can still help when off the grid
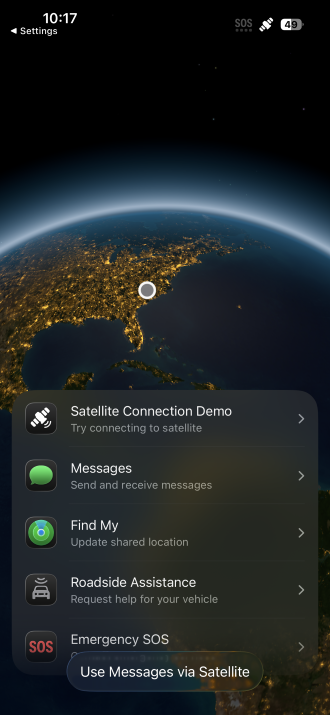
Image: Max McCaskill
If you're off the grid and don't have a signal, newer iPhones are equipped with Emergency SOS via Satellite. It's built for destinations like national parks, a remote trailhead, or a stretch of highway with zero bars.
Once Emergency SOS via Satellite is activated, your iPhone instructs you on how to connect directly to a satellite and walks you through a short set of text-based questions about your emergency. Those answers get relayed to a dispatcher who can send help to your location. You'll need to be outdoors with a clear view of the sky (it still works through light clouds), and this feature is only available on the iPhone 14 series and newer models.
2. Set up your Medical ID for emergencies
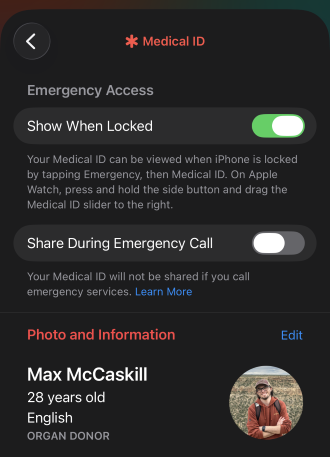
Image: Max McCaskill
Medical ID puts your critical health information, allergies, medications, current conditions, and blood type on your Lock Screen, where a first responder can see it without needing your passcode. If something happens and you can't speak for yourself, this feature shows emergency services any important information they need to know.
To set up Medical ID:
- Open the Health app.
- Tap your profile picture in the top corner.
- Tap Medical ID, then Edit.
- Fill in your medical conditions, allergies, medications, and emergency contacts.
- Turn on Show When Locked so this information is visible from the Lock Screen without unlocking your phone.
3. Set up a Check In when exploring alone
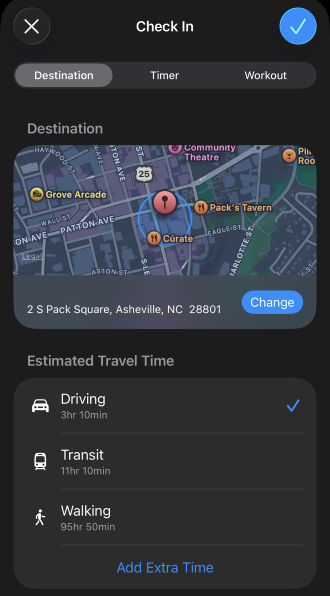
Image: Max McCaskill
Check In lets your iPhone automatically notify a chosen contact if you don't arrive somewhere as expected. It's one of the most important iPhone safety features for traveling alone because it keeps your status updated without having to constantly share your location or provide text updates to friends and family back home.
You start a Check In session with a chosen contact before you head out, and your iPhone tracks your trip in the background. Once you arrive safely, the session ends automatically, and your contact isn't notified.
If you don't reach your destination as expected, or you don't respond to a check-in prompt within 15 minutes, your contact gets an alert with your last known location, along with your device's battery level and signal strength.
To set up a Check In:
- Open the Messages app.
- Select a conversation with the person you want to check in with.
- Tap the Plus Button next to the message field.
- Select Check In from the list of options.
- Choose your destination and estimated arrival time, or select Custom to set your own trip parameters.
- Tap Send.
You can also control exactly how much your contact sees if your Check In alert gets sent. Go to Settings > Apps > Messages > Check In Data and choose:
- Limited: Your last known location, plus battery and signal info
- Full: Your last known location, battery strength, signal info, your route, and the location of your last iPhone unlock
4. Turn on Share My Location and use Find My
Share My Location is a continuous feed of where you are, visible to whoever you've shared it with, for as long as you leave it on. It lives in the Find My app and is available on all iPhones.
If you want your friends and family to have a constant view of where you are anywhere in the world, this is the feature to enable. However, note that you can only share your location using this method with other Apple devices. Your friends and family with Android devices will need a third-party app.
To turn on Share My Location and share it with one of your contacts:
- Open Settings.
- Select your profile at the top.
- Tap Find My.
- Enable Share My Location.
- Choose which device is sending your location if you have more than one.
- Open the Find My app.
- Go to the People tab.
- Tap Share My Location and choose a contact.
This setting works best if you leave it on for the entire length of a trip. It's passive by design and doesn't require you to constantly recheck settings. Nobody gets an alert when you move around. They simply have to open the Find My app and look when they get curious.
iPhone location features: Check In vs. Share My Location
| Check In | Share My Location | |
|---|---|---|
| Best for | A single trip with a clear destination | Ongoing visibility for the length of a trip |
| How it works | Tracks one journey, ends automatically on arrival | Runs continuously until you turn it off |
| When your contact is notified | Only if something looks wrong (you don't arrive or don't respond) | Never automatically, they have to check the app |
| What they see | Last known location, battery, signal (or full route, if enabled) | Your live location, whenever they look |
5. Run a Safety Check before and after you travel
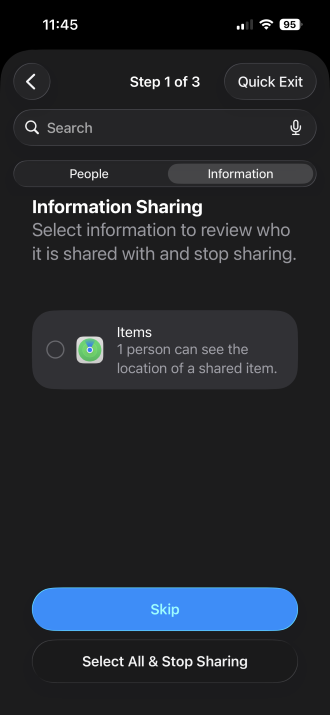
Image: Max McCaskill
Safety Check is an internal iPhone audit tool that shows you everyone and everything that currently has access to your location, shared photos, and your data. It was developed so you can quickly review that data and shut off anything you don't recognize or no longer want active. This could include apps you no longer use, or people like ex-partners and old roommates.
Safety Check includes two options:
- Manage Sharing & Access: Review everything currently shared on your device and revoke access from anything you don't recognize or no longer want active.
- Emergency Reset: This immediately cuts off all sharing at once. It's the more drastic option, and it's built for situations like leaving a relationship where someone else had access to your accounts.
You should run a Safety Check before your trip in case an old share you forgot about is still active. Once you're back, run another one to check out any apps you downloaded or connections you made while traveling.
To turn on an iPhone Safety Check:
- Open Settings.
- Tap Privacy & Security.
- Tap Safety Check.
- Choose between Manage Sharing & Access and Emergency Reset.
- Walk through the list and revoke access to anything you don't want active.
6. Know how Roadside Assistance via Satellite works
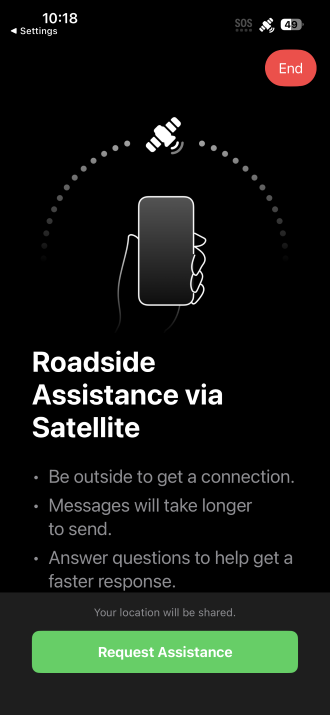
Image: Max McCaskill
If you're road-tripping through rural stretches, national parks, or anywhere else your carrier's coverage map goes blank, Roadside Assistance via Satellite connects you to AAA directly from your iPhone using a satellite signal if something goes wrong. Now a dead battery or a flat tire in the middle of nowhere doesn't turn into a much bigger problem.
To use Roadside Assistance via Satellite:
- When you have no cell signal, open the Messages app.
- Type Roadside in the address field.
- Follow the onscreen prompts to answer a few quick questions about your situation.
- Point your phone toward the sky as directed to maintain the satellite connection.
- Your request gets relayed to AAA or another local emergency service that can dispatch help to your location.
Similar to Emergency SOS via Satellite, this feature is hardware-gated to iPhone 14 and newer models. You should also note that this feature is extremely limited outside the United States, so it's not as helpful for international travel.
7. Turn on Stolen Device Protection
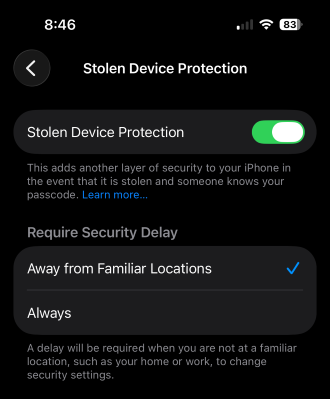
Image: Max McCaskill
Having your iPhone stolen while traveling is a nightmare. Not only do you lose your easiest way to communicate, but you also have to worry if the thief can access your data. Phone theft doesn't require a dramatic mugging. It's often just someone grabbing an unlocked phone off a café table while you're not looking or picking your pocket as you walk down the street.
Stolen Device Protection is built to protect your iPhone if it's stolen. It adds a security delay and requires Face ID or Touch ID—with no passcode workaround—before anyone can change your Apple ID password, turn off Find My, or add a new Face ID to your phone while you're away from familiar locations like home.
To turn on Stolen Device Protection:
- Open Settings.
- Tap Face ID & Passcode.
- Scroll down to Stolen Device Protection.
- Enable Stolen Device Protection.
To avoid the worst-case scenario of having your personal iPhone stolen, we also recommend most people consider taking a burner phone when traveling internationally. These devices are cheap, don't contain much personal data, and won't ruin your trip if they're lost, damaged, stolen, or seized at the border.
8. Make sure Crash Detection and Fall Detection are turned on
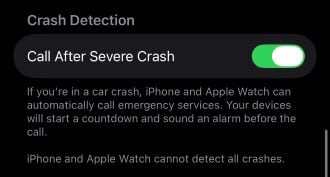
Image: Max McCaskill
Crash Detection uses your iPhone's or Apple Watch's motion sensors to recognize the impact of a severe car crash and automatically calls emergency services, even if you're unconscious and can't do it yourself.
In the event of a suspected crash, your iPhone or Apple Watch will show an alert that it's about to call for help. If you don't respond to the onscreen alert within ten seconds, your iPhone assumes you need help and places the call, then notifies your emergency contacts with your location.
Crash Detection is on by default, but it's worth confirming it's active:
- Go to Settings.
- Tap Emergency SOS.
- Make sure Call After Severe Crash is turned on.
If you're pairing your trip with an Apple Watch, Fall Detection does something similar for hard falls. It's a good feature to enable if you're taking a hike or even just walking down bumpy cobblestone streets. Unlike Crash Detection, Fall Detection is not always turned on by default. In fact, users who compete in sports with bumps or quick stops like skiing and horseback riding will usually have disabled the feature because it can register false falls, so make sure it's turned on.
To enable Fall Detection:
- Open the Apple Watch app on your iPhone.
- Tap the My Watch tab.
- Tap Emergency SOS.
- Turn on Fall Detection.
9. Get your carrier settings right before you travel internationally
International service is more expensive than domestic service. That said, don't let prices keep you from staying connected and safe. While it may be fine to rely on Wi-Fi sources to stay connected on a group trip at a resort, any trip that involves you traveling alone and exploring requires an actual data plan.
The three easiest ways to stay connected while traveling abroad are:
- Current carrier's international roaming: Some carriers include free international roaming data or a daily travel pass in the plan you already have, so check with them before assuming you'll need to pay for something new.
- Travel eSIM: A digital SIM you can set up before you even leave home to provide international service. Your regular number stays active the whole trip, which makes it the simpler option for trips a week or shorter.
- Local SIM: A physical SIM you buy after you land. They can often be found right at the airport. This method usually costs less for longer trips, but note that it replaces your phone number while abroad.
What if your family or friends use Android?
Many of Apple's safety features—like Check In, Share My Location, and Find My—only work if the person you're sharing your location with is also on an iPhone. If the people you'd actually want looped in during an emergency are on Android, those features won't reach them the same way. Additionally, there are important safety features that your iPhone simply can't do by itself, like running its own VPN.
Here are some apps worth knowing about that can cross the Android divide and keep you and your iPhone safe:
- Noonlight: A silent panic button that stays on your screen. Hold it down if you feel unsafe, and if you don't enter your PIN to cancel within ten seconds, it automatically alerts local emergency services with your location.
- Strava Beacon: Shares your live location with up to three contacts for the length of a run, hike, or walk. The person on the other end doesn't even need the app; Strava sends them a link they can open in any browser.
- NordVPN: Encrypts your internet connection so your passwords and banking info aren't exposed to anyone else on the same network. That said, remember to never use public Wi-Fi for sensitive tasks like banking when abroad, even with a VPN.
These apps work on iOS and Android, so it doesn't matter what phone the person on the other end is carrying. For the full breakdown, here's our complete list of the best safety apps for solo female travelers.
iPhone safety settings for solo travelers: FAQ
Do iPhones have built-in safety features?
Yes, iPhones come with a full set of safety tools already installed, with no extra apps or subscriptions required. Common iPhone safety features include Emergency SOS, Medical ID, Check In, Safety Check, Crash Detection, Find My, and Stolen Device Protection.
How do I use my phone to stay safe while traveling?
The best way to use your phone to stay safe while traveling is to set up emergency features before the trip. Set up Medical ID and Emergency SOS so first responders can reach you quickly if you have a problem. Use Check In to automatically alert someone if you don't arrive at a destination as expected, and run a Safety Check to make sure no outdated location or data sharing is still active.
What version of iOS do I need to use iPhone safety features?
iPhone safety features have been released across different iOS versions, but you should always be running the latest available version of iOS to ensure they work properly. Apple regularly patches security issues and rolls out safety feature improvements with new updates, so there's not much upside to sitting on an older version. Go to Settings > General > Software Update to check if you're due for an iOS update.
Max McCaskill
Sr. Staff Writer

Find a better phone plan
Thousands of cell phone plans unpacked. All the facts. No surprises.


.png?w=280&h=280&usm=20&usmrad=0.8&fit=crop "Best Cell Phone Deals for August 2026: Get the New iPhone 17 for Free")

.jpg?w=280&h=280&usm=20&usmrad=0.8&fit=crop "Best Back-to-School Phone Deals 2026: Free iPhones, Tablets, Watches, and More")


.png?w=280&h=280&usm=20&usmrad=0.8&fit=crop "The Best Family Cell Phone Plans for 2026")